
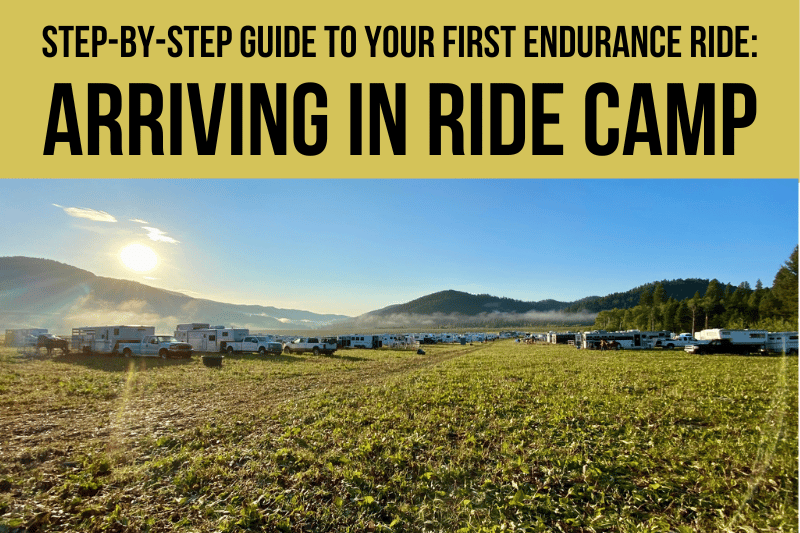
Arriving at your first equestrian endurance ride is exciting, but it can also be nerve-wracking. Where should you park? Do you need to check in? What should you do first? This article explains what to expect.
Did you catch the first article in this series? Check out the Step-By-Step Guide to Your First Endurance Ride: Before Leaving Home.
Choosing a Parking Spot
When you first arrive in camp, take a few minutes to understand how camp is laid out before choosing a parking spot. You might be able to do this from behind the wheel, but sometimes it works better to pull over and walk around. Just be sure your rig isn’t blocking traffic.
Depending on the venue, some rides will have required you to book your campsite ahead of time. Others may have someone directing traffic as you arrive in camp.
However, many ride camps take more of a first-come-first-served, freeform approach. If that’s the case, here’s what to look for as you decide where to park:
Common Areas
Ride management will have large areas set aside for registration, vetting, and ride meetings. These will usually be marked with “no parking” signs, cones, or surveyor tape. If not, you’ll still be able to identify them by things like folding tables covered in paperwork or lines of horses waiting for the vet.
It’s nice to camp close to the vetting area so you don’t have to spend a lot of time walking to and from your trailer during holds. However, this may not be a good idea if you or your horse will be bothered by the hub of activity.
If you choose to park at a distance from the vetting area (or have to because the closer spaces are already taken), don’t worry. You can use a well-stocked crew bag for holds instead of hiking all the way back to your trailer.
Porta-Potties and Horse Water
Most ride camps will be dotted with porta-potties and large troughs from which you can dip buckets of water for your horse. Depending on your personal camping setup, you may want to park reasonably close to both amenities. Bear in mind that these are shared resources, so you should avoid claiming them as “yours.”
Footing and Slope
Before setting on a parking spot, check the ground where your horse will be contained. If it’s full of holes or rocks, you might want to reconsider.
Additionally, watch the slope to be sure you can get your camper or LQ reasonably level.
Plants
As reader Sarah points out in the comments, it’s important to pay attention to what is growing in your prospective camping spot.
Look out for poison ivy, poison oak, nettles, and other nasties. Make sure there isn’t a lot of forage (especially legumes like alfalfa or clover) that will represent a major dietary change or potential health hazard for your horse.
Trees can offer shade and windbreak, but they can also become dangerous in stormy weather. Additionally, some have leaves or bark that are toxic to horses.
Escape Route
Try to park in a spot where you could pull out mid-event if necessary. You wouldn’t want to be blocked in if your horse was colicking and needed to get to a clinic.
Bear in mind that additional trailers will be arriving after you. If possible, park with your rig situated to facilitate pulling out onto an obvious thoroughfare on which nobody will set up camp.
Saved Spaces
It’s not uncommon to see riders saving camping spots for their friends. Some people frown on this, but others argue that their horses do better when camped next to their buddies. Regardless, it doesn’t hurt to share a quick “Hello, mind if I park here?” with your prospective neighbor.
Care for Your Horse
It may feel strange to settle in before making your presence official with a trip to the registration table. However, everyone in ride camp will understand that your top priority is to take care of your horse.
Unload Your Horse
As soon as possible, get your horse off the trailer. If he ties well, you can tie him to your trailer while you set up his containment system. If not, get those panels or electric tape up quickly so he can step out of that hot trailer and look around.
Offer Water
Hydration is extremely important, and your horse may already be dehydrated from his trailer ride. Make sure to offer him water right away. Most ride camps will have communal troughs along the thoroughfares through camp. You can lead your horse over to drink directly from these, and also dip out buckets for him to drink by your trailer.
Some ride managers encourage riders to set extra buckets out by the communal troughs. These can be filled by the passing water truck, ultimately reducing the number of refill trips that are necessary throughout the event.
Set Up Your Horse Containment System
When choosing exactly where to set up your containment system, be sure to consider your neighbors and the size of ride camp overall. In a very large camp, there may be plenty of room for a generously-proportioned electric tape paddock. If space is tight, though, take care not to use more than your share. Additionally, be mindful of the need for safe passage between trailers.
For your own convenience, think about easy access to your feed and tack. For example, you may not want to have to walk all the way around the rear trailer door every time you need a hoof pick. Also consider whether you’ll be able to see your horse from inside your camper, LQ, or tent.
For your horse, make sure the ground is free of holes and comfortable for lying down. Consider also whether your trailer can offer some shelter from afternoon sun or wind.
Take a Walk
Take your horse for a walk around camp so he can stretch his legs. This will also give you both an opportunity to check out the sights with no pressure to accomplish anything in particular. If there’s grass, hand-grazing is optimal for your horse’s mind and body.
Feed Your Horse
Get some hay in front of your horse as soon as possible, and let him eat as much as he wants. Not only will this help him relax, but it’ll support good gut health and hydration throughout the weekend.
Speaking of gut health, minimizing the risk of gastric ulcers is a high priority during the stress of travel and competition. Consider feeding Purina Outlast throughout the weekend. I typically give my horse a 1-cup serving before he gets in the trailer, then again when I arrive in camp.
Electrolyte Your Horse (or not)
Many riders choose to electrolyte their horses upon arrival in camp. The goal is to top up the body’s stores after any losses that occurred during travel, as well as to encourage drinking. However, another common opinion is that electrolyting horses that don’t need it just makes expensive pee.
Personally, I usually administer a half-dose of electrolytes upon arrival in camp. I top-dress it on a handful of low-starch feed mixed with a gut-supporting supplement like Mad Barn’s Visceral+. Another option is to offer your horse two buckets of water – one plain, and the other laced with electrolytes – and let him choose.

Care For Yourself
With so much on your mind, plus being nervous, you may have forgotten to take care of your own needs.
Take a deep breath. Maybe get out your camp chair and sit down for a minute.
Drink some water. And some more water. If it’s hot, pop some electrolytes. Use this link to get a free sample pack of my favorite LMNT electrolytes with any order.
Eat something.
I’m serious! You don’t want to get behind on your own hydration and nutrition. It’s important for everything from your confidence to your physical strength.
Once you’ve fueled your body, go ahead and set up your own ride camp sleeping quarters and make yourself at home.
Register
Once you and your horse are settled in, it’s time to mosy over to registration. Here’s what to take with you:
- AERC membership card (and any other membership cards, such as for regional clubs)
- Payment (likely check or cash)
- Health certificate, coggins, and/or brand inspection if required
Go to registration by yourself. Your horse isn’t needed for this step, and it’s safer for everyone if he stays at the trailer.
The registration area may be a table outdoors, or sheltered in a horse trailer or structure. The paperwork will typically be handled by the ride manager or a volunteer.
If you didn’t already fill out your entry form and sign a liability release online, you’ll be asked to do so. In most cases, you’ll also pay your entry fee at this time.
Upon registering, you should come away with:
- Times for the pre-ride meeting and pre-ride vetting
- A rider number. Some managers will want you to write the number on your horse’s rump with grease pencil or otherwise affix a number to your tack. Regardless, you’ll want to commit this number to memory ASAP. You’ll need it frequently throughout the event.
- Your ride card, which you must keep track of throughout the event.
You will need to have your card with you for all vet checks, including the pre-ride vetting. Historically, riders have carried their cards with them. During COVID, however, some managers found ways to keep all cards in camp (instead of with the riders) to minimize touching by different people. Some still use those protocols today because they circumvent common problems like lost or soaked ride cards.
Go for a Shakeout Ride
After your horse has had a break from the trailer, it’s a good idea to saddle him up for a short ride. The advantages of doing so include:
- The horse gets to stretch out and get some movement, which will likely improve how he feels physically and mentally.
- You’ll notice if you forgot any of his tack and have a chance to do something about it before ride morning.
- If you ride a mile or two up the trail where you’ll start in the morning, your horse will have a chance to check out any potential bugaboos.
There’s no need to go far or fast. Just a couple miles at a walk or jog will do.
When you get back, you may have some down time to settle in, chat with your neighbors, and hang out with your horse.
You’re just getting started…Keep reading the rest of the series!
Part 3: Step-by-Step Guide: The Evening Before
Part 4: Step-By-Step Guide: Starting the Ride
Too Much to Remember? You Need the Quick Reference Guide!
The entire Endurance Riding Step-by-Step series is now available in an at-a-glance format for easy reference beyond the reach of wi-fi or cell service. Just download it to your phone and use the clickable Table of Contents for speedy access to the information you need, when you need it. Click to claim yours!
You might also like
This post includes affiliate links, and I may earn a small commission (at no extra cost to you) when you purchase through these links. I only recommend products and services I think are helpful and useful. Thanks for helping me offset the cost of maintaining this blog as a free resource!
Adding on to the footing, when you are looking for a spot be wary of plants in the area you will contain your horse. Up in our area I have seen the following:
-poison ivy (even nearby, my horse knocked over his corral panels into the poison ivy once even though we werent directly in it, also be able to walk around the paddock without getting into that stuff!)
-grasses/clover/alfalfa – our ride camps are often hay fields, I have seen horses come to ride camp early in the season or set up camp where there is excessive clover and go hog wild on the yums, then colic before the ride even starts or tie up/thumps if its vastly different from what they have at home
-trees – while they provide shade and a break from the weather, we had a derecho come through ride camp 2 seasons ago (basically a string of multiple tornados) and I watched large trees come down on the paddocks of those parked nearby. No horses were hurt but something I had never thought of, usually we considered the treeline spots to be the best pick. Use your own discretion
Really excellent points, Sarah! Thanks for bringing them up!