
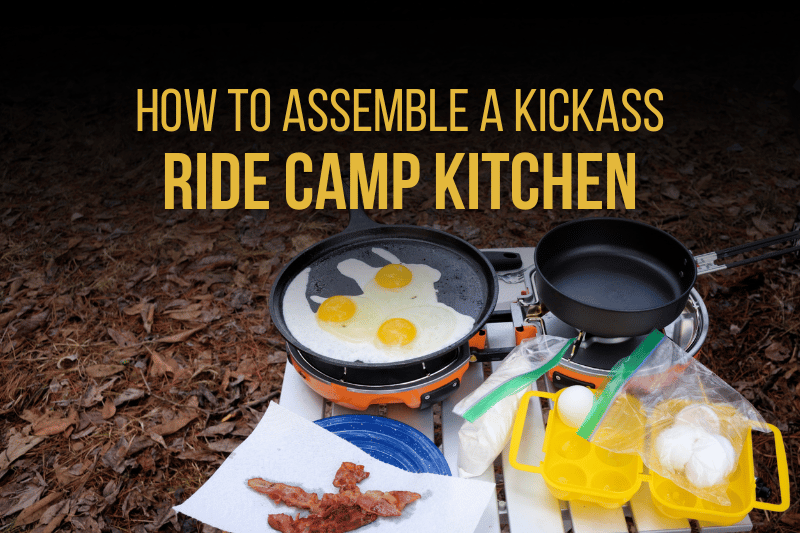
Even without the luxury of a living quarters trailer, you can enjoy hot meals after a day in the saddle. This post explains how to assemble a complete, yet efficient, camp kitchen.
As a lifetime outdoor adventurer, I’ve cooked more wilderness food than I can remember. From whitewater rafting to backpacking, canyoneering to adventure motorcycling, skiing to paddling, rain and cold to heat and wind, I’ve pulled satisfying meals together in every situation imaginable.
The good news is that ride camping is a version of car camping. That makes assembling your kitchen far simpler than a situation in which you need to pack everything on your back or keep it dry through raging rapids. Weight and space aren’t significant issues. You just need to be able to keep your food cold, open its packaging, get it hot, and store any leftovers.
I highly recommend assembling a ride camp kitchen that lives in a “K-box,” or kitchen box, year-round. You’re much less likely to leave items behind if you aren’t trying to share them with your home kitchen.
Here’s what you’ll need:
Keep Your Food Cold
In order to enjoy fresh food at a ride (and trust me, you’ll feel better if you do), you’ll need to keep it at a safe storage temperature. The obvious way to do this is, of course, to use a cooler. Not the fleece kind you put on your horse – the thing we used to call an ice chest.
Coolers come in a vast array of qualities, sizes, materials, and price points. Generally speaking, this is one of those things where you get what you pay for.
Styrofoam and soft-sided coolers likely won’t get you through more than a night, especially in hot weather, but that doesn’t mean you need to shell out for a Yeti. Mid-range hard-sided coolers are suitable for most endurance weekends (2-4 nights) if properly managed.
Look for a cooler that’s big enough to have room for your food after it’s half full of ice (the ideal ratio is actually 2:1 in favor of ice). But, don’t go so big that you have a lot of extra air space in there after adding your food.
A drain spout at the bottom, preferably with a screw-in cap that’s attached so it doesn’t get lost, is a nice feature. Also look for a secure lid latch, or buy some cam straps to supplement a weak one.
Check out How to Pack a Cooler & Keep it Cold Longer Than You Thought Possible for additional gear geek tips.
Make Your Food Hot
Hot, easy-cleanup camp meals are possible without an oven or microwave. All you need is a stove and a few accessories.
Camp stoves, like coolers, are available at a wide range of price points. You can spend a lot on a high quality stove (my favorites are made by Partner Steel), but that’s overkill for most endurance riders.
If you don’t mind keeping your cooking simple, you can get a lot of mileage out of a simple, single burner stove. (I’ve used this one for over a decade.) It screws easily onto a one of those 16-oz propane cylinders that are cheap and easy to find at service stations, big box stores, and online. If you’re uncomfortable using outdoor gear, don’t worry; you really can’t go wrong with one of these babies.
Want to get a little fancier and cook some eggs while your coffee water heats? This article reviews a variety of two-burner stove options ranging from $100-200.
Note that some stoves are better than others when it comes to wind protection. Do you need to pay extra for a good wind screen? Maybe not, for ride camp purposes. If you can safely set up your stove in a well-ventilated horse trailer, away from flammables, wind probably won’t be a major issue anyway. (Don’t try to use a stove inside a tent, though, okay? Just don’t.)
What about those tiny stoves like the Jetboil and Pocket Rocket? They’re adorable. They’re lightweight. They’re compact. They’re great if you’re hauling your gear through the mountains on muscle alone. But, they’re also relatively delicate and sometimes finicky. Unless you’re also taking the thing backpacking, get yourself a cheaper, clunkier, more robust camp stove.
Cookware
You don’t need a huge pile of cookware to make a decent meal, especially if you plan ahead. However, you will need a few basics. I suggest that you bring:
- One small saucepan (with lid)
- One medium saucepan (with lid)
- One medium frying pan, and
- A kettle for boiling water. Sure, you could heat water in a saucepan, but the kettle will heat faster and make pouring easier.
If money is tight, you can find used cookware at a thrift store. Or, there are some very nice nesting sets that save on space.
Bear in mind that camping-specific pots and pans are usually made to be lightweight, which means thinner bottoms and less even heat distribution. Since camp stoves don’t always offer the best flame modulation, you may want to consider a thicker, heavier cookware option if you’ll be cooking anything prone to scorching.
Utensils
Get yourself a plastic box with a snap-on lid. That’s going to be your “kitchen drawer” inside your K-Box. Inside, you’ll need:
- A spatula (the pancake-flipper kind)
- Two cooking spoons (1 slotted, 1 solid)
- Tongs
- Vice grips (These are great for handling all sorts of hot things, including cookware without handles.)
- A can opener
- Scissors
- A paring knife
- A chef knife
- A small cutting board (plastic is lightweight and easy to clean)
- Leather gloves (for hot pads), and
- A utility lighter (Yes, even if your stove has a built-in igniter. Those things are notoriously unreliable).
For bonus points, throw in a corkscrew. And, roll your knives in a kitchen towel to protect the blades.
Consumables
Your K-box should also contain some paper and plastic items for practicality and convenience. These include:
- Plastic cutlery
- Paper plates
- Paper bowls
- Paper towels
- Coffee filters
- Disinfectant wipes (these can be used to do dishes in a pinch)
- Ziplocs in various sizes
- Aluminum foil, and
- Trash bags
Additional Necessities (Plus a Few Luxuries)
If you drink coffee, you’ll either need to go with instant (Mount Hagen is the best brand I’ve found) or have an easy way to turn hot water in the nectar of the gods. My preferred method is to use a pour-through cone set atop an insulated mug. A plastic French press works, too, but is much harder to clean without running water.
Whatever your hot drink of choice, an insulated mug with a lid is fabulous to have on hand for sipping while you tack up your horse.
You’ll need a water jug or two. I use 5-gallon jugs from the military surplus store. They aren’t the easiest to pour out of, but they’re leakproof and indestructible. Mr. Sweaty prefers the keg-style beverage dispenser that you’d see at any football game, but he does have to bungee the lids on tight and strap them in the corner of the truck bed to avoid spillage.
You’ll also need a dish sponge and a small, leakproof bottle of dish soap. (Put the soap in a Ziploc anyway. Trust me.) If you want to get fancy, you can bring a couple dish tubs, but it’s usually easier just to add soap and hot water directly to your largest, dirty pan.
Better yet, don’t get any pans dirty! Stay tuned for a future post on minimal-cleanup ridecamp meal ideas.
Also throw in some cooking spray (in case you forget something better, like butter), salt and pepper, and maybe a little bottle of Tabasco.
A table is really handy. Folding tables work great if you have the space, or try a Roll-a-Table from REI. Either option beats bashing your head on the gooseneck or your shin on the tagalong as you try to cook on the tailgate of your truck.
A lantern is nice for overhead light if you’ll be cooking in the dark. Go electric; it’s easier than gas, and there are many rechargeable options ranging from $20 – $150.
Oh, and you need the K-box itself. Once you’ve gathered all the contents, you’ll know what size box to shop for. A good-quality tote with a latching lid should serve you well for many years. Those latches really matter, especially in your windy truckbed, so pay a little extra for the heavy-duty box with robust latches.
That’s it! Now you’re all set to take on ride camp cooking in style.
You might also like
This post includes affiliate links, and I may earn a small commission (at no extra cost to you) when you purchase through these links. I only recommend products and services I think are helpful and useful. Thanks for helping me offset the cost of maintaining this blog as a free resource!
Great article! Thank you for sharing. 🙂
Thanks for reading! 🙂